Lynis is an open-source security auditing tool. Used by system administrators, security professionals, and auditors, to evaluate the security defenses of their Linux and UNIX-based systems. It runs on the host itself, so it performs more extensive security scans than vulnerability scanners.
ClamAV is an open-source (GPL) anti-virus engine used in a variety of situations including email scanning, web scanning, and endpoint security. It provides a number of utilities including a flexible and scalable multi-threaded daemon, a command-line scanner and an advanced tool for automatic database updates.
0. Preliminary requirements:
"CentOS 7" template installed on the server;
"nano" text editor installed (yum install nano -y).
1. Installation of Lynis
mkdir /usr/local/lynis
cd /usr/local/lynis
wget https://downloads.cisofy.com/lynis/lynis-2.7.5.tar.gz
tar -xvf lynis-2.7.5.tar.gz
The newest version can be found at: https://cisofy.com/download/lynis/
2. Using Lynis
To execute Lynis we first have to move to its folder:
cd /usr/local/lynis/lynis
In order to see Lynis tutorial execute:
./lynis
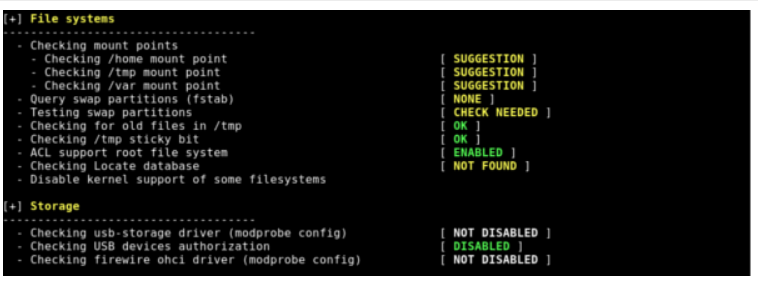
To check entire VPS execute:
./lynis --check-all
1. Installation of ClamAV
yum install epel-release
yum update
yum install clamav-server clamav-data clamav-update clamav-filesystem clamav clamav-scanner-systemd clamav-devel clamav-lib clamav-server-systemd
2. Enabling Freshclam
Freshclam will keep ClamAV up-to-date. In this tutorial, it is set to check 4 times a day for new files.
cp /etc/freshclam.conf /etc/freshclam.conf.bak
sed -i '/Example/d' /etc/freshclam.conf
Edit "clam-freshclam.service" file:
nano /usr/lib/systemd/system/clam-freshclam.service
And paste the content:
Run the freshclam as daemon
[Unit]
Description = freshclam scanner
After = network.target
[Service]
Type = forking
ExecStart = /usr/bin/freshclam -d -c 4
Restart = on-failure
PrivateTmp = true
[Install]
WantedBy=multi-user.target
Enabling freshclam to start automatically:
systemctl enable clam-freshclam.service
systemctl start clam-freshclam.service
To manually update ClamAV virus database use the following command:
freshclam
3. Configuring ClamAV deamon
cp /usr/share/clamav/template/clamd.conf /etc/clamd.d/clamd.conf
sed -i '/Example/d' /etc/clamd.d/clamd.conf
mv /usr/lib/systemd/system/clamd@.service /usr/lib/systemd/system/clamd.service
Now we have to change the clamd service file:
nano /usr/lib/systemd/system/clamd.service
[Unit]
Description = clamd scanner daemon
After = syslog.target nss-lookup.target network.target
[Service]
Type = simple
ExecStart = /usr/sbin/clamd -c /etc/clamd.d/clamd.conf --nofork=yes
Restart = on-failure
PrivateTmp = true
[Install]
WantedBy=multi-user.target
Now move to "system" directory:
cd /usr/lib/systemd/system
And enable clamd to start automatically:
systemctl enable clamd.service
systemctl start clamd.service
4. Manual scan options
To scan all files on the VPS and show name of each file:
clamscan -r /
To scan all files on the VPS, but only show names of infected files when found:
clamscan -r -i /
To scan all files on the VPS, but only show names of infected files, while scan running in the background (while in progress, you can check the scan with "jobs" command):
clamscan -r -i / &
To scan all files in all users home directories:
clamscan -r /home
To scan all files in the USER directory and move infected files to different Quarantine directory:
clamscan -r --move=/home/USER/Quarantine /home/USER
To scan all files in the USER directory and delete the infected files:
clamscan -r --remove /home/USER