Let’s Encrypt is a free, automated, and open certificate authority (CA), run for the public’s benefit. Let’s Encrypt is a service provided by the Internet Security Research Group (ISRG).
In this tutorial, you will find out how you can benefit from these certificates by providing security for your websites. The tutorial was prepared with our "Ubuntu 16.04" template and installed LEMP stack. How to install LEMP please see more information here.
In the following, we're setting up mydomain.com. HTML is served from /var/www/html, and challenges are served from /var/www/letsencrypt.
Before starting, please make sure that mydomain.com is pointed by A type record to the server. A DNS A Record that points your domain to the public IP address of your server. This is required because of how Let's Encrypt validates that you own the domain it is issuing a certificate for. For example, if you want to obtain a certificate for mydomain.com, that domain must resolve to your server for the validation process to work. Our setup will use mydomain.com and www.mydomain.com as the domain names, so both DNS records are required.
Nginx preparation for certificate
Create a file /etc/nginx/snippets/letsencrypt.conf containing:
location ^~ /.well-known/acme-challenge/ {
default_type "text/plain";
root /var/www/letsencrypt;
}
Create a file /etc/nginx/snippets/ssl.confcontaining:
ssl_session_timeout 1d;
ssl_session_cache shared:SSL:50m;
ssl_session_tickets off;
ssl_protocols TLSv1.2;
ssl_ciphers EECDH+AESGCM:EECDH+AES;
ssl_ecdh_curve secp384r1;
ssl_prefer_server_ciphers on;
ssl_stapling on;
ssl_stapling_verify on;
add_header Strict-Transport-Security "max-age=15768000; includeSubdomains; preload";
add_header X-Frame-Options DENY;
add_header X-Content-Type-Options nosniff;
Create the folder for the challenges:
mkdir -p /var/www/letsencrypt/.well-known/acme-challenge
Create a file /etc/nginx/sites-available/mydomain.confcontaining:
server {
listen 80 default_server;
listen [::]:80 default_server ipv6only=on;
server_name mydomain.com www.mydomain.com;
include /etc/nginx/snippets/letsencrypt.conf;
root /var/www/html;
index index.html;
location / {
try_files $uri $uri/ =404;
}
}
Enable the site:
rm /etc/nginx/sites-enabled/default
ln -s /etc/nginx/sites-available/mydomain.conf /etc/nginx/sites-enabled/mydomain.conf
And reload Nginx:
Certbot
Install the package:
apt-get install software-properties-common
add-apt-repository ppa:certbot/certbot
apt-get update
apt-get install certbot
Request a certificate:
certbot certonly --webroot --agree-tos --no-eff-email --email YOUR@EMAIL.COM -w /var/www/letsencrypt -d www.domain.com -d domain.com
Prepare Nginx to server HTTPS
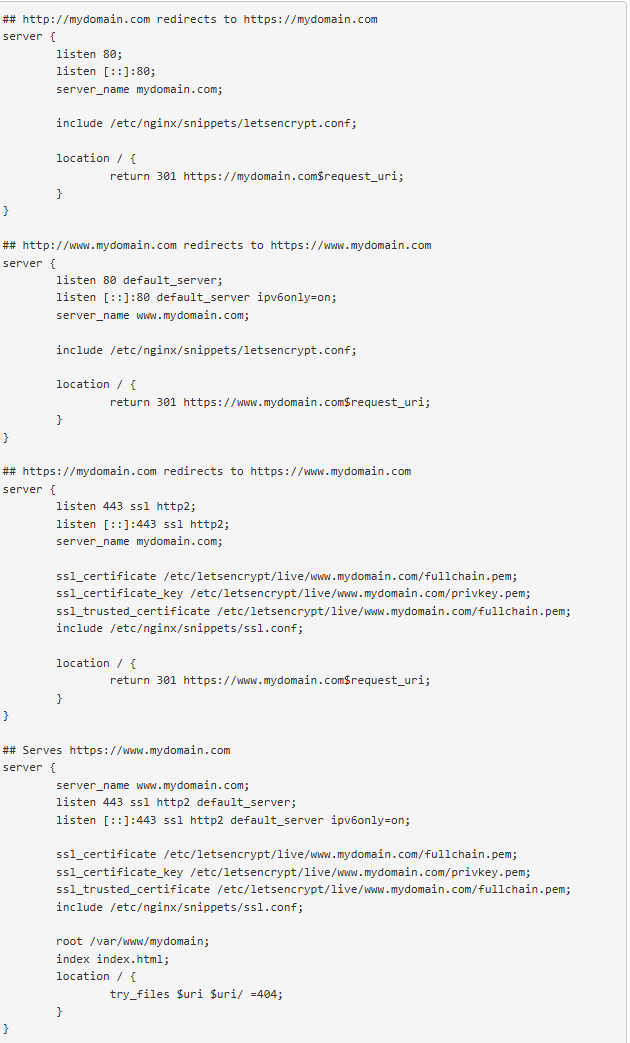
Now that you have a certificate for the domain, switch to HTTPS by editing the file /etc/nginx/sites-available/mydomain.conf and replacing contents with:
Then reload Nginx:
Now you should be able to see your website at https://www.mydomain.com
Automatic renewal using cron
Certbot can renew all certificates that expire within 30 days, so let's make a cron for it. You can test it has the right config by launching a dry run:
Create a file /root/letsencrypt.sh:
#!/bin/bash
systemctl reload nginx
Make it executable:
chmod +x /root/letsencrypt.sh
Edit cron:
And add the line:
20 3 * * * certbot renew --noninteractive --renew-hook /root/letsencrypt.sh